Emma Hardie Moringa Cleansing Balm Review

I think this is one of those products that is on the verge of taking the beauty blogging world by storm. When I first heard of Emma Hardie, her products were on QVC and to be honest I didn't take a lot of notice because it didn't seem like a brand aimed at my age group or skin type. It was only when I was scouring Caroline Hirons' blog for new Skincare regime ideas that I realised that actually what I think my skin needs probably isn't what it needs at all.

Caroline has taught me so much through her blog; including recommending the best products for combination skin. I never realised that if you have oily skin you shouldn't use a foaming cleanser, nor did I realise that you shouldn't use really strong alcohol based products. Because of this, I have introduced Emma Hardie into my regime hoping it signals new beginnings for my neglected skin. 


Emma Hardie Cleansing Balm - £23.80 (Feel Unique Sale Price)

How I've been Using Emma Hardie Cleansing Balm

I don't use Emma Hardie morning and night because I feel that it's a little too heavy for a morning cleanse, instead I've been using Soap and Glory Peaches and Clean to freshen up my face which isn't anywhere near as luxurious but at the moment it's working!

When I do use EH I make sure that I make time to do it properly, I'll either sit in the bath and use it or sit on my bed and use it. Either way I double cleanse on a night to make sure I've got every little scrap of makeup off especially round my t-zone and chin which is where I'm more prone to spots. I always make sure I use a clean flannel and only use warm running water from the tap (dipping your flannel back into dirty bath/sink water kind of defeats the whole object of cleansing!)

Stating the Obvious
  • Emma Hardie is a balm cleanser which is like nothing I've ever used before, I've always used milk or the dreaded foaming cleansers. Basically you scoop a little out, warm between your finger tips and then massage into your face (there's a handy leaflet in the box which shows you how to do this).
  • The product itself seems very oily to me, something which would normally deter me totally from putting it on my skin but when you have added a little water it does go into more of a milky consistency.
  • It feels absolutely beautiful when massaging it in, I think you can literally feel it melting the makeup, dirt and grime that's been sat on your face all day.
  • I think it smells absolutely beautiful; I can really smell the Neroli in it over all the other ingredients
  • After the first use my face felt so clean, honestly cleaner than it's felt for a long time. Admittedly I have been neglecting my skin and using wipes for the past few months so it was so nice to do a proper cleanse with this. 
  • I have a real issue with raised blackheads on my nose and open pores around my nose; where foundation and powder tend to sit in and look absolutely disgusting but from the first cleanse these have reduced gradually; they're still there but just not as noticeable so when I feel my nose it doesn't feel as bumpy as it did.
  • The only negative I have to say about this so far is that it's not as good at removing eye makeup as I'd hoped it would be, I always seem to have some left even though I double cleanse. However I shall persevere because there could be a strong possibility that I'm just not using it properly!
Overall First Impressions

Very good. I have been using it for a week now and so far there has been no negative reaction from my skin although I'm a big believer in that it takes around a month to make an accurate, well informed judgement on whether a skincare product is working for me so I'll do another post about it in January when I'm around half way down the pot. 

Please bear in mind that I have combination/oily skin. The reason why I choose to start using EH is because this winter I have found that my skin has become dry and flakey around my chin and at the sides of my face so I figured I needed to get myself a proper skincare routine, and with the help of Caroline Hirons' blog I found this :)

Diesel Loverdose Eau De Toilette Review

Said Luvverdose not L-overdose

Today I'm showing you my latest perfume purchase. Since trying this out in store at Christmas, I've wanted to get a bottle of Diesel Loverdose but just never had the spare cash to do so. The eau de parfum retails at roughly around £36 for 30ml so when I saw the new eau de toilette in Debenhams I decided to see if there was much of a difference because the eau de toilette is only £29.50.

diesel-loverdose

diesel-loverdose

diesel-loverdose-bottle

For those of you who don't know the main difference between toilette and parfum is the strength and intensity of the fragrance; generally you don't need to spray so much of parfum to get an intense scent purely due to the level of perfume concentration... basically toilette is a lighter scent and doesn't linger as long.

I'm the kind of person who likes to spray LOADS, when I spray Viktor and Rolf Flowerbomb I usually end up making myself choke/sneeze because it's so strong (being eau de parfum) so it's nice to go for eau de toilette because I can happily spray away and feel fine.

Loverdose is a really difficult fragrance to describe, and I think you'll either love it or hate it but for me it's a perfume that makes me want to keep sniffing my wrist. For me its in between being musky and sweet,  I'm not too keen on sweet smelling perfumes (I used to love Amor Amor, but now not so much) but this one sits really well with me. The perfume shop describe it with notes of vanilla, liquorice and mandarin.... unless you're a perfume buff that description would probably mean nothing to you but I'd say that if you like scents like Calvin Klein Euphoria, Chloe, D&G The One and Ghost Deep Night then you might like this too... but saying that, regardless of what you normally go for I would definitely recommend trying this at your nearest perfume counter.

I used my Debenhams Beauty Card to get some discount off this, I had £10 on it (to be honest I wouldn't have splashed out had it not been for the discount!) and I also got a free bottle of body lotion! I can't find the eau de toilette version on the Debenhams website at the moment but you can get it from Escentual for roughly £30.

NARS Angelika Blush

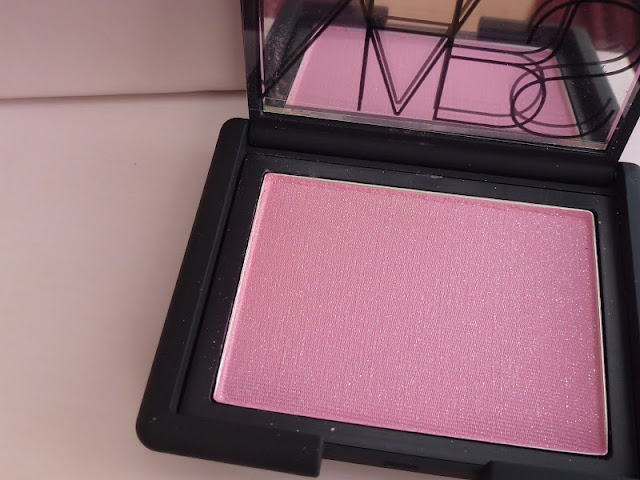
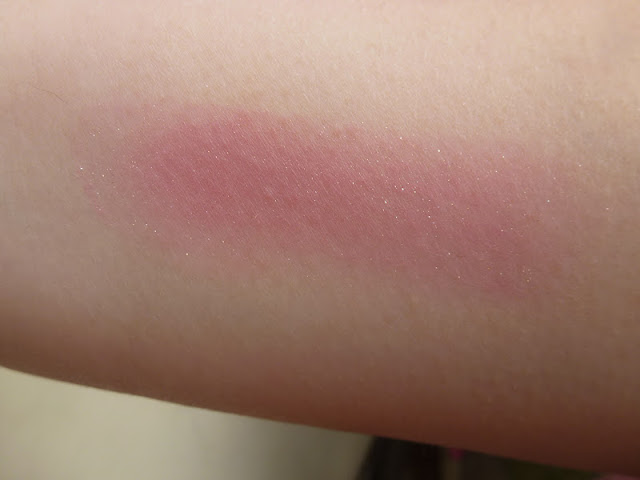
NARS are known for their cult 'Deep Throat' and 'Orgasm' blush so I wanted to try one of their lesser known blush shades so here's a review and swatches of NARS Angelika Blush.

I sort of knew what to expect quality wise as I already have Deep Throat and I absolutely love that one but obviously Angelika is very very different in terms of shade and wearability. For me, Angelika isn't a shade I would wear daily purely because it's just too sparkly, had it been a more matte shade it would probably be easier to wear but as it is I will look great for special occasions or nights out when I wear a little bit more makeup and I don't mind a bit of sparkle. I think its also nice that this is a more 'traditional' blush colour (like the sort you expect blusher to be when you're little) rather than a peachy shade which I often use to help contour as well as blush.

nars-blush

nars-angelika

barbie-pink-blusher
nars-angelika-swatch

I think it does suit my pale skin tone but as I say it's just not my normal kind of shade, however I am really pleased that I chose this as I think we all get a bit wrapped up in what's popular and forget about the less popular shades offered by brands like NARS so it's nice to discover something I enjoy without being told 'you'll love this'... if that makes any sense at all?

You can buy NARS Angelika and other shades from NARS Online for £21.00. After trying this shade I now have my eye firmly on Gaiety which I think is a matte pink (judging by website swatches).

Pros and Cons of University

Graduation was full of mixed feelings really, finishing university was a huge relief for me because it signified the end of 3 years of really hard work and 3 years of fighting with myself to not drop out before the final hurdle. I don't think young people get enough information about university before applying because they think it's the natural 'next step' so I've put together a list of pros and cons so you might be able to answer the question 'Should I go to university?' a little bit more easily.

graduation-photo-leeds-met

Pros of going to university

- You should hopefully widen your knowledge of a subject you love and come out with a degree
- You meet some lovely people
- You get student discount in lots of shops
- Even if you can't afford to go the government will help with fees
- Some professions require degree level education (but it's still well worth looking at alternative routes if you're still unsure about university)
- It gives you a taste of independent 'adult' living
- There's opportunity to have a fantastic social life
- If you choose to, you can get involved in lots of interesting extra-curricular activities and societies
- There are student loans to help with fees and maintenance

Cons of going to university 

- Your degree definitely does not guarantee you a job
- It can be very cliquey
- It is very hard work and if you are not willing to push yourself it probably isn't for you
- It costs A LOT and you will be left with debt (although Martin Lewis will tell you that tuition fee debt isn't a bad debt)
- You cannot afford (in money or time) to party all the time in the second and third year, it is NOT a three year party unless you want to come out with a rubbish classification (unless you are a superhuman genius who can bash out an A grade essay in 8 hours)
- Be prepared for it to be a massive shock to the system, I honestly thought it was going to be the making of me; moving to Leeds and starting a new chapter of my life, living the big city lifestyle.... When in reality I didn't fit in with my flatmates, it cost an absolute fortune and I ended up back at home permanently after Christmas, and I still had to pay full rent as the terms and conditions stated that unless you personally found a new occupant, you had to pay the rent whether you were there or not.
- Driving to and from Leeds was such a pain, especially when some days I only had an hour or 2 of teaching so make sure that if you don't want to live near your university that you don't go somewhere too far from home!

If you're really unsure about university you need to ask your in-school/college careers advisor to recommend some alternative routes into what you want to do. There are some fantastic degree-level apprenticeships out there, it's just a case of finding the right one for you.

How to Overcome a Fear of the Dentist

So yesterday I had my first dental treatment in over 5 years... A pretty big bit of repair work to a previously filled tooth that had broken.

To put it bluntly I was shitting myself. But I had made the first step to overcoming a fear of the dentist.

The only experiences I ever remembered with a dentist were bad, my old dentist was rough, made me bleed and basically scared me for what I thought was life, I never thought I would set foot in a dentist ever again. My philosophy became 'if it don't hurt don't fix it' and although my broken tooth didn't hurt I knew it was inevitable that it would one day break even more.

The sound of the drill, the sensation, the trepidation and the fear of needles just kept me away completely and it's been a fair while since my tooth first broke and as I suspected, more came off last week so I had to bite the bullet (thankfully not in a literal sense) and book in.

Honestly this time last week I did not think I'd be writing this post, and don't get me wrong I am not completely rid of my phobia, but at the end of the day I don't think the dentist will ever be a pleasant experience But my aim is to try and make it a bearable experience, so here are my top tips for getting on the road to getting a bit of confidence back.

Image from weheartit

1. Think about why you have a fear, if it is something that your current dentist has done then consider changing; I think a lot of fear derives from the association of bad things; for example my dentist always got angry if I ever got upset; he never attempted to try and put me at ease he just told me to 'shut up and stop being so stupid'... Not good when you already feel silly for being upset. Ask around your friends and Family and see who they go to or who they've heard is good.

2. If you can afford it, go private. I know this isn't for everyone because it can get very expensive depending on your treatment. A check up at my new dentist costs £60 I think whereas NHS is around £20 I believe; yes this is expensive but I see it as an investment... I know she's going to do her best not to hurt me and I know she has the patience. TIME is very pressing with NHS dentists and often they are pressed for time and need you in and out as quick as possible which is why they aren't always accommodating when you need a bit of extra support. The one I go to is a 'minimal intervention' dentist which means that they work on prevention of problems rather than the cure. Plus if you are in desperate need of treatment, they generally don't have waiting lists.

3. Walk through the door; no matter how hard it is I recommend just going into the dentist and making an appointment, even with the NHS, book in for a check up. Turn up on the day, walk into the room and explain to the dentist what the problem is; only have him/her do what you are comfortable with. For example the first time I went I was in tears as soon as I walked in, I explained the obvious (that I was petrified) and she asked me to sit on the chair, I didn't lay down I just sat and chatted for 5 minutes and then I said that I was happy to lay back and let her have a look, providing she didn't put the hook thing in my mouth or touch any of my teeth, which she was fine with... She did at one point ask to put the hook in to test one tooth which I agreed to and she was soo gentle! She then took some X-rays (easy, pain free) and finally treated my teeth with a fluoride solution (again, easy and pain free) and BAM that was it, my first dental appointment over with and I walked out wondering what I fussed about. REMEMBER that YOU are paying the dentist to provide a service, whether NHS or private and you do not have to let them do anything you don't want, providing you are polite the dentist should be very obliging and understand your needs.

4. ASK for anything... Dentistry nowadays is way more advanced than it was even 5 years ago, I didn't know numbing gel even existed so when I had an anaesthetic injection I asked for plenty of numbing gel and she really did coat my whole gum in the stuff which meant that I didn't even feel the injection going in! Some dentists also have new technology called 'air abrasion' which means that where possible they will not use a drill; basically they blast away the bits of decay with tiny particles which makes it relatively noise and pain free!! At the end of the day... If you don't ask, you don't get.

5. Occupy your mind. If you actually get sat down in a dentist chair, first of all MASSIVE WELL DONE, be proud of yourself and second of all try and keep your mind occupied, it might sound totally daft and you might think it will never work but it does for me... I close my eyes and wiggle my toes, the right side 10 times and the left side 10 times, just the counting from side to side makes you think of something other than what's going on in your mouth.

6. Reward yourself, I know dentist treatment is expensive in itself but try and give yourself a treat afterwards; whether it's a lipstick you've been umm-ing and ahh-ing over for ages or just a takeaway later that night... Rewards aren't just for children, they work for adults too!!! My reward last night was an indian takeaway because I'd not had one in ages!

I hope this has helped someone in some way, if it gets one of my readers to a dentist after a number of years then I will be very happy... Trust me I never thought I would ever visit a dentist except unlesss I was totally sedated but I have broken the barriers and the feeling when Id had my filling was immense, I felt so proud of myself!!!

Please, Please, Please try and go, I know I sound like your mum now but I really regret leaving it so long because your teeth are such an important part of your body; everyone looks at them when you talk and healthy looking teeth will make you far more confident... and most importantly we all know how painful tooth ache is, so don't let it get to that stage!!

Uses for TCP

I hated the thought of this when I was little, when I had a cut or a graze this was seriously the most painful antiseptic ever!! But as I've got older I've realised how good this is for spots. Yes it stinks, everyone knows you've used it because you can smell it a mile off, but I can just about deal with that, especially when I'm trying treat spot prone skin.


Basically what I do with this is I pop it onto a cotton wool pad and sweep it over the affected area (if you have already broken the skin this stings more than normal so beware!). If the spot is just red, LEAVE IT ALONE... as tempting as it is to try and squeeze the life out of it, please don't, I speak from experience and I now have numerous scars on my face from spots which weren't ready to be popped. However, if it does have a white head on it, you can do something about it as long as you're hygienic, which again is where TCP comes in.

First of all, wash your hands and then once you have wiped the affected area with TCP, I then suggest that you wipe your fingers with TCP to give you extra protection from reinfecting the open spot. Then using some tissue over your fingers, gently squeeze the spot until the lovely gunk has come out of it... then immediately after, with a fresh cotton pad, sweep some more TCP over it and hold it on the spot for a minute or so to make sure you have made it as antiseptic as possible.

I know you can get all these posh 'spot zappers' but 9/10 I've found that they don't really work for me and they are a bit of a rip off. I find that if I use TCP on a big angry red spot it will reduce the redness and swelling and make it more manageable in terms of covering it up and sorting out any possible infection. And the best thing about this is that it's available pretty much everywhere; Superdrug, Savers, Supermarkets, Boots... you should be able to pick this up somewhere no matter how rubbish your local shops are!!

John Frieda Full Repair Review

Normally I'm going on about trying to find the perfect haircare for greasy hair, but there are occasions when my hair has just needs an injection of moisture and shine to it because it's over processed.

Because my hair is blonde I find it really difficult to get a decent shine on it and I often end up with really damaged ends to the point where you can really see how split they are if I don't use loads of product on it to smooth it down when straightening... and then I end up with a vicious circle of dry to greasy from too much product. 

This is where John Frieda Full Repair comes in.*

john-frieda-full-repair

I've known about John Frieda for ages, I used to use the brunette range when I hard dark hair aged 15/16 so I was looking forward to trying the new full repair range; I was sent the shampoo and the deep conditioner. Full repair should help over-styled hair to look more radiant and healthy without the build up; sounds like the perfect remedy! I think it's important to review the items in their own right as well as together because lets face it, we haven't always got time to use a deep conditioning treatment because it does need a little while to work properly. 

Full Body Shampoo

I dont always like to use conditioner so this is great for me, my hair felt really clean and smelt great without any weighty feel of product build up which is pleasing! It also made brushing after washing a little easier too; usually when I just use shampoo without conditioner my hair goes into some sort of rats tail mess before I brush it but this shampoo seemed to sort that out a little bit, it was still a bit of a pain to brush but didn't take as much effort as it normally does. Definite thumbs up from me!

Deep Conditioner

I love a good deep conditioner, I don't know many people who don't... that feeling when you're just washing it out after 5 mins of relaxation and your hair running through your hands feels like silk! (went off on a bit of a mills & boon-esque tangent then, sorry!). This full repair one really isn't any exception, in fact I'd say that it was slightly better than some I have tried; usually deep conditioners are really thick and quite frankly difficult to rinse out of your hair properly without getting that 'ohhh no' moment when you feel you're hairs still slimey in one part when you've got to the drying stage. 

Full repair is quite thin in consistency and a little difficult to get a decent amount onto your hands but when you get it onto your hair it glides through effortlessly. I tend to only put it on the bottom 3/4 of my hair just because my roots don't need the intense moisture with them being oily already. I left it on for 5 minutes and rinsed it out really well and dried it... my hair felt beautiful, so manageable, shiny and smooth. Exactly what I expected from full repair, and it seemed to hold my straight style for longer than usual. 

Overall Verdict

As you can imagine using both products together gives you double the repair but given my hair type I won't be using the deep conditioner overly regularly not only because I don't think it'd be good for my hair but also because you really don't need to use it for any reason other than a hair treat when you really need it. The tub will last ages I reckon, so definite value for money there and the tube of shampoo is also pretty sizeable! 

Deep conditioner is £5.99 from Boots
Full Repair Shampoo is £5.69 from Boots

If you have issues with damaged hair or you find yourself tugging at your hair and snapping it by brushing, I definitely recommend trying something from this range, even if it's just the conditioner but I honestly think it's a fab range! If you want to find out more about this range and other ranges just head over to the John Frieda website.

High Street vs. High End Pressed Powders

Todays post is for the benefit of those of you who really think about where you spend your money, what you spend it on and the benefits of said products. There's the age old argument in the beauty blogging world about whether or not high end makeup is worth splashing out on; today I'm going to compare two pressed powders; Rimmel Stay Matte (Pink Blossom) and MAC Mineralize Skinfinish Natural (Medium Plus). 

As you know I have major issues with oily skin so I really need a good mattifying powder just to set my makeup and reapply during the day without it looking awful and cakey. Also instead of using liquid foundation I'll often use a powder alone when I'm on holiday abroad because I find that liquid is just too heavy when it's so warm.

rimmel-stay-matte-powder

mac-mineralize-skin-finish-natural


Price

MAC: £20.50 from Debenhams
Rimmel: £3.99 from Boots

A massive £16.51 difference in price so it's really important that you know whether it is worth buying MAC or not!

Packaging

MAC: A classic flip top pan, one issue being that the clear plastic probably wouldn't take much pushing out, one drop at the wrong angle and I'd imagine it'd be out, I've never had an issue with it but it's worth noting the potential for breaking!

Rimmel: Pull off lid, very much a budget design but doesn't impact the product in any way. 

Product Performance: 

MAC: In the pan the powder is so unbelievably soft and easy to get onto your brush, if anything I'd say it was bordering on a bit messy because it is so soft. You don't need much on the brush to get a full face of product on. 

If I apply this in the morning it gives me confidence that I'm going to be shine free for at least 2/3 hours after which I usually apply some more if I have it with me. What I will say is that if you are someone who constantly reapplies during the day, do be careful that this doesn't make you look cakey because it will build up fast on your skin. I'd recommend a spritz of a makeup refresher before you dive in with this for the 3rd or 4th time in the day just to see if that makes a difference. 

I'm NW18 and the shade medium plus seems pretty perfect to me, Light would be too light I think but any darker and it'd look orange.

Rimmel: I found this really difficult to get onto the brush and after a few uses the product like clumped up to form shiny patches in the pan which do need scraping off if you want to get some product onto the brush; this might be something to do with the fact that it's flat rather than domed, or maybe it's just the product, I'm not sure. However, because not much product goes onto the brush it is less likely to look cakey on the skin so quickly.

I didn't think that this was as good for use alone without any foundation underneath, I really did feel completely bare. However I would say that this would definitely be worth trying if you don't have spots and you are just looking to even out your skin tone and mattify your skin. 

Overall which one am I most likely to rebuy?

For what I use it for and how often I use it I'm definitely going to rebuy MAC Mineralize Skinfinish because it just totally does the trick for me whereas Rimmel just doesn't do enough, even though there's a massive price difference, in this case it's worth it for me to splash out. 

What I will say is that if your skin isn't too oily and you only have a slight shine after maybe 4 hours,  try Rimmel first before you jump in with MAC but unfortunately for those with darker skin tones you might not find a Rimmel shade that suits your colour because they all seem very light ('beige' is their darkest shade) whereas MAC's shade selection seems to suit a wider range of skin tones; definitely go to a MAC counter if you can and get matched.

Micro Bead Nail Art Tutorial

A real 2012 retro nail art idea is the micro bead manicure; it's a simple but kind of messy nail art tutorial but it can look really effective for a special occasion.

microbead-manicure

I got this idea from Coleyyyful when she posted about her little ebay buy, I had to try them just out of curiosity. The ebay seller has a number of different colour beads so there's probably something for everyone depending on what sort of colour you are wanting. I got silver (pictured above) and rainbow so I could have two different looks. 

You get 20g for £1.75 which isn't bad at all; because these are so tiny 20g is actually a lot! After using them once I still have enough for at least another 3/4 applications I reckon, if not more! As Coleyyyful's tutorial suggests, this is a really easy look to recreate; there are 3 simple steps (after the obvious prepping beforehand which you do before any manicure). All you need is a little pot to keep the beads in, a bigger tub (where excess beads drop), a nail colour of your choice and a top coat.

- Choose a base colour and paint it onto your nail (I used one quite thick coat)
- Hold your finger over the larger tub and pour beads over the nail until completely covered; repeat on all nails and let them set for a minute or two.
- Paint some good quality topcoat over the top to try and seal the beads onto the nail.

And there you go, a Micro-Bead manicure for £1.75!

I love the look of these especially for a special occasion; not so sure about the feel of them but they are very eyecatching. Unfortunately for me longevity is pretty much nil, they are so easily flicked off but as I say it'd be ideal for a night out or 2 days absolute tops because after that they start to look scruffy as some of the beads have fallen off. This isn't anywhere near as messy as I first thought, they don't drop off in bed like I thought they would, they just come off during everyday activities (i.e. Washing up, opening cans etc.)

Xen Tan Dark Lotion Review with Before and After Photos

You should have already heard about Xen Tan, it's a bit of a cult product really; raved about by some of the biggest beauty bloggers and first introduced to most people when a sample tube featured in one of the first GlossyBoxes. Without before and after photos, reviews of fake tan become a little bit futile, I think so this is a review of Xen Tan Dark with before and after photos.

xen-tan-dark

Paraben and oil free, this tanning lotion applies with a sheer finish and has subtle olive undertones. It's supposed to be the 'weekly tan' so it encourages the assumption that it should have some staying power. It is vanilla scented; which to me is a refreshing change for a tanning brand to admit to it having some scent because often they say 'fragrance free' but it actually leaves you smelling like a biscuit tin.

Before I got this I was a bit tan-o-phobic to be honest, I'm quite pale and I have a right panic on with most tans because I'm worried about ending up like an Oompa Lumpa. 

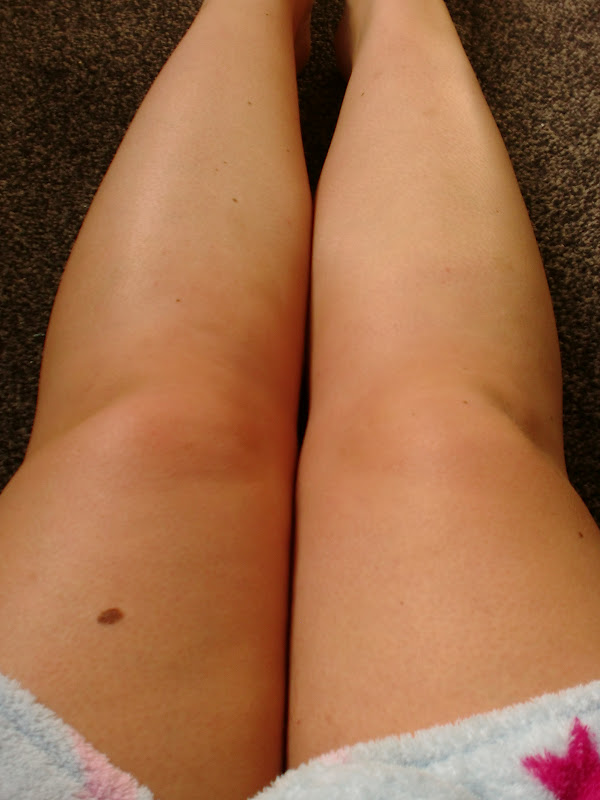
But given the hype I thought I'd take the plunge, invest in a tanning mitt and try this bad boy out. Please be warned, you are about to see a photo of my very pasty, chunky, white legs.

white-legs

Glad that's over, I thought it was better that you saw a before and after picture rather than just after because then you'd have nothing to compare it with. 

Before I applied this I used some Xen Tan Exfoliator in the shower to get rid of the dead skin, It smells divine but I shall tell you more about that anothet time.

So when you apply the product it does leave a trace of where it's been so you don't forget where you've been and cake it on. I only apply quite a thin coat and it soaks in well and doesn't leave your skin at all greasy; in fact I'd say my skin feels really moisturised after using this. I usually apply it before going to bed so I can sleep on it for a good 6 or 7 hours and wash it off in the morning so I know it's had enough time to develop. 

This is what my legs look like after Xen Tanning.

tanned-legs

I absolutely love it, it's the perfect colour which I totally didn't expect. I actually applied some of this when I came back from Greece because I don't tan at all and everyone commented on what a lovely colour I was.

The only downside to this for some people is that is does smell, but strangely enough I actually like the smell. The smell does pretty much disappear after your first shower though so it's nothing to worry about too much! 

Unlike some tanners I've tried, this fades gracefully and doesn't end up patching around your elbows or knees which is a massive plus, and it does have some decent staying power unless you wash excessively or go swimming a lot.

This is a bit of a pricey product at £22.40 for 236ml but I think it's definitely worth it because I've had a fair few uses out of it and it's still got about a quarter left in the tube. 

You can buy this on the Feel Unique Website

Other fake tan reviews:
Vita Liberata NKD SKN

Estee Lauder Double Wear Review

This is a product that seems to have split the blogging jury somewhat, some love it and some pretty much loathe it. Some said it was too heavy and felt like a mask, others said it gave them the perfect coverage. I don't normally use Estee Lauder products because I always thought of the brand as something for the older ladies but I thought I'd give Double Wear a try. 

estee-lauder-doublewear-foundation

Containing SPF 10, Estee Lauder say that this foundation can stay in place for up to 15 hours and can power through heat, humidity and non-stop activity. It shouldn't come off on your clothes (the dreaded orange collar!) and it should feel lightweight and comfortable.

First of all, I was very surprised at how thin in consistency it is, I find it really difficult not to waste any when I pour it out to use it because its surprisingly thin considering it's a medium to full coverage foundation, by how people were talking about it I was expecting a thick gloopy mess.

I don't wear this on a daily basis, I tend to alternate my foundations according to the occasion or what my skin is like. I wear Double Wear when I'm going out or when I feel like my skin is particularly bad.

It's very easy to work with and blends really well, I use the Sigma F80 brush and honestly at this present moment I couldn't think of any better tool to help me apply my foundation. A little of this product does go a long way and I know that i'm in danger of losing the product just through wastage on my brush and on my hand. 

To me, it doesn't feel like a mask at all, it just feels like any normal foundation; no different to my MAC Studio Fix Fluid just with better coverage. If you really are worried about it feeling too heavy on your face then I definately recommend asking at the counter for a sample of both Double Wear and Double Wear light. The on the other end of the scale there is Double Wear Maximum cover which acts as a total camouflage type of makeup. 

As for staying power, I did a full hours zumba class whilst wearing this and it pretty much stayed put. Used with Benefit Porefessional, this foundation keeps oil breakthrough to a minimum and is the absolute perfect colour for me.

The only downsides to this foundation are the fact that it doesn't come with a pump (although I do believe they can be bought!) and possibly the price. At £33.50 it's not cheap by any means and the bottle is still only 30ml, however I personally think it's worth the money and I will definately be rebuying when I finish this bottle (which will be a long while yet!)

You can buy this from Debenhams  for £33.50 but I don't recommend that you buy it blind, I highly recommend going into store and trying this out first!

Afternoon Tea at Betty's York

Betty's in York is infamous for having a huge queue outside; there are only certain criteria for being able to book so most people just turn up on the day and quite rightly so because it's one of the iconic places to eat out in Yorkshire. If you haven't heard of Betty's it's a gorgeous traditional tea room which was established in Harrogate in 1919 and eventually opened 5 other tea rooms in various other places in Yorkshire, including York. For me, although it originated in Harrogate, I always associate Betty's with York.

Bettys-in-yorkThey serve all manner of gorgeous treats from Yorkshire Cream Tea to Steak and Ale Pie, but let's be honest if you have to treat yourself to Afternoon Tea at Betty's least once in your life. Their Afternoon Tea consists of 4 crustless triangle finger sandwiches (Salmon & Prawn, Roast Chicken, Roast Beef and Egg), A sultana scone with jam and clotted cream and a selection of 3 mini cakes (I got brownie, pistachio macaroon and a raspberry tart) all washed down with a few china cups full of their finest tea (made with proper tea leaves, you get a strainer and everything). 

I'll be honest when I went I was expecting to want something else to eat when I got home but what you get is surprisingly filling (I even saved a cake and asked them to box it up for my other half, he thought I was being really nice, but really, I was just too full to eat it haha). Sitting in Betty's is not something I'd actually put my other half through but I'm definitely planning to take my nana at some point (72 and never been to Betty's, she'd LOVE it).

It's not cheap, but for all the tea and cake lovers out there, it's a definite must! Afternoon tea isn't cheap at £17.95 (2012 price) but it's not something you'd do every weekend and we all deserve a treat once in a while so next time you're in York or Harrogate, seriously consider a visit!

Tigi Catwalk Haute Iron Spray Review

Personally, I'm not a big lover of using loads of hair products but I do think that iron spray or some sort is pretty essential. What is key for me is that it doesn't weigh my hair down (because my hair has a tendency to get greasy quickly) but still makes it look sleek and straight. 

I bought the Tigi Catwalk Haute Iron Spray when I had a bit of a splurge on Feel Unique in between Christmas and new year purely because my hairdresser used it and I loved it; the product itself and the gorgeous packaging, it looks great on my dressing table.

tigi-haute-iron-spray

It's supposed to protect your hair from heat styling up to 232 degrees whilst helping to add shine and de-frizz the hair.

It's an aerosol spray rather than a pump action which I think means that the product is distributed evenly and without a build up. I will say that with this product a little does go a long way, a quick spray and theres enough to work with, I don't spray the whole of my hair first I section and then spray just before I straighten. It also doesn't make your hair 'crackle' in with the heat of the straighteners; some heat protectors wet the hair so much that the when the straighteners hit your hair it 'sisses'... this really is just a light mist if used correctly.  (sorry about the description, i'm rubbish with describing sounds, hope you know what I mean).

Without an iron spray my hair feels really dry at the ends and tends to flick up at the back quickly but with this product it really makes my hair look sleek and shiny and helps to hold it in place. It also smells lovely, which is one of my main loves about it; it smells like I've just come out of the hairdressers. The actual scent as described on Feel Unique is 'Mandarin Patchouli Noir'.

Overall I would definitely recommend this product for all hair types and it is a styling product suitable for greasy hair but just make sure that you don't get too spray happy with it otherwise it will make your hair look greasy! I will definitely re-buy when this eventually runs out.

Lush Lip Scrub Review


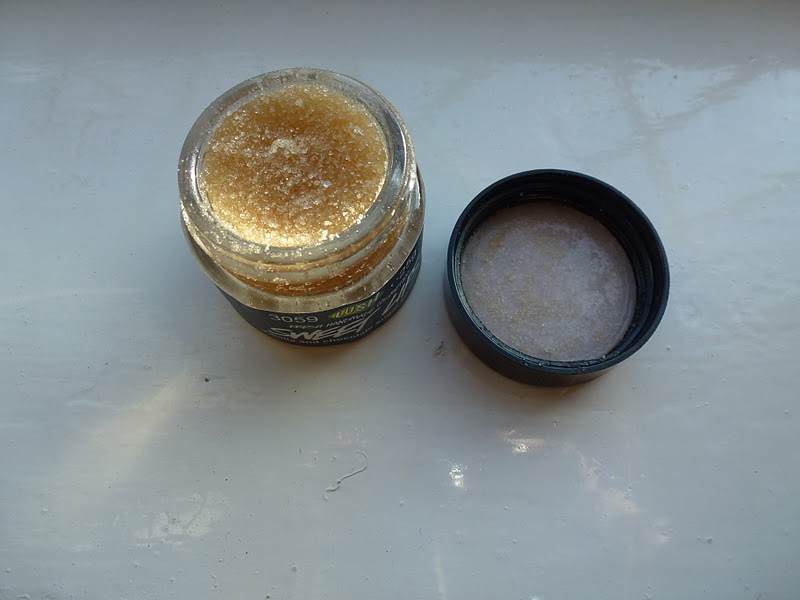
Made with castor sugar and jojoba oil, these lip scrubs are supposed to buff away any dead skin to leave your lips feeling soft and smooth. As of 2018, Lush no longer sell 'Sweet Lips', they do however sell lots of different lip scrubs, including a similar Cookie Dough lip scrub and they also bring out limited edition ones periodically.

lush-sweet-lips-lip-scrub

lush-lip-scrub

First of all this smells amazing; really vanilla/chocolatey and it tastes absolutely great, probably the best thing about this is the fact that it's made with actual edible sugar. I hate it when a lip product smells absolutely amazing but tastes foul; this tastes pretty much as good as it smells and although I wouldn't recommend spooning this into your mouth, it really does taste nice and sweet when you're using it. 

To use it you just put a bit on your finger and massage onto your lips, I concentrated on the worst areas of my lips but also tried to spread it all over, then licked it off when I'd finished :-P My only issue with this is that it can be a little bit difficult to get some on your finger while the tub is still full (as mine is) but this is completely minor and wouldn't put me off rebuying.

After 2 uses I am starting to see a difference in my lips, I think it's great to use before you apply lipstick so or before you apply lip balm just so you're getting rid of the excess skin to give you like a 'clean' base for whatever product comes next.

I definitely recommend this if you have problem lips or even if you have perfect lips and you want something to keep them that way. You can buy the Lush lip scrubs online for £5.95 each.

Other Lush reviews:
I Love Juicy Shampoo
Handy Gurugu Hand Cream
Golden Egg Bath Bomb
Ultrabland Cleanser
Sesame Sun Lotion
D'Fluff Shaving Soap

Lush I Love Juicy Shampoo Review

This was my first Lush purchase for a long time, I daresay that my last purchase for myself was about 5 or 6 years ago simply because I sort of forgot about it and always classed it as a bit over priced for what it was. But since I've been blogging I've heard all sorts of rave reviews about their hair products so I thought I'd enquire as to whether Lush had shampoo for greasy hair, because as gross as it sounds - greasy hair is a real pain in the neck and my main aim is to try and cut down the number of times I have to wash my hair. Currently it's every day but I really need to take it down to at least once every other.

She introduced me to I Love Juicy; explaining that her mum had bought it and a massive bottle lasted her, her sister and her mum for a few months for 2 reasons... a) you don't need a lot to get a good lather b) you don't need to use it every time you wash your hair. 

lush-i-love-juicy

I love the smell and how it makes my hair feel; it does give me around another extra day or so without washing my hair and the smell really sticks to your hair... it's a gorgeous citrus lemon scent! The one thing I will say is that I don't think it'd be suitable for someone with heavily coloured hair because the citrus ingredients do have a tendency to strip; given that I'm blonde it can have some lightening qualities especially if I use it for a few days on the trot; however that isn't one of the benefits which Lush lists. 

Basically this is one shampoo that you should definitely try if you have greasy hair or you tend to get a product build up. It is £6.25 for a small 100ml bottle which is ideal for a first try or if you want a weekly hair cleanse/detox and they also do larger bottles if you want to use it more frequently.